Saturday, February 9, 2013

Preparing for Spring

We've had such a warm winter here in south Texas that many people are already starting gardens. The plants and even the bees are a little confused! My neighbor, Bonnie, has had humming birds come and go all winter! I, too, want to get my garden going, but will err on the side of caution and wait until March.

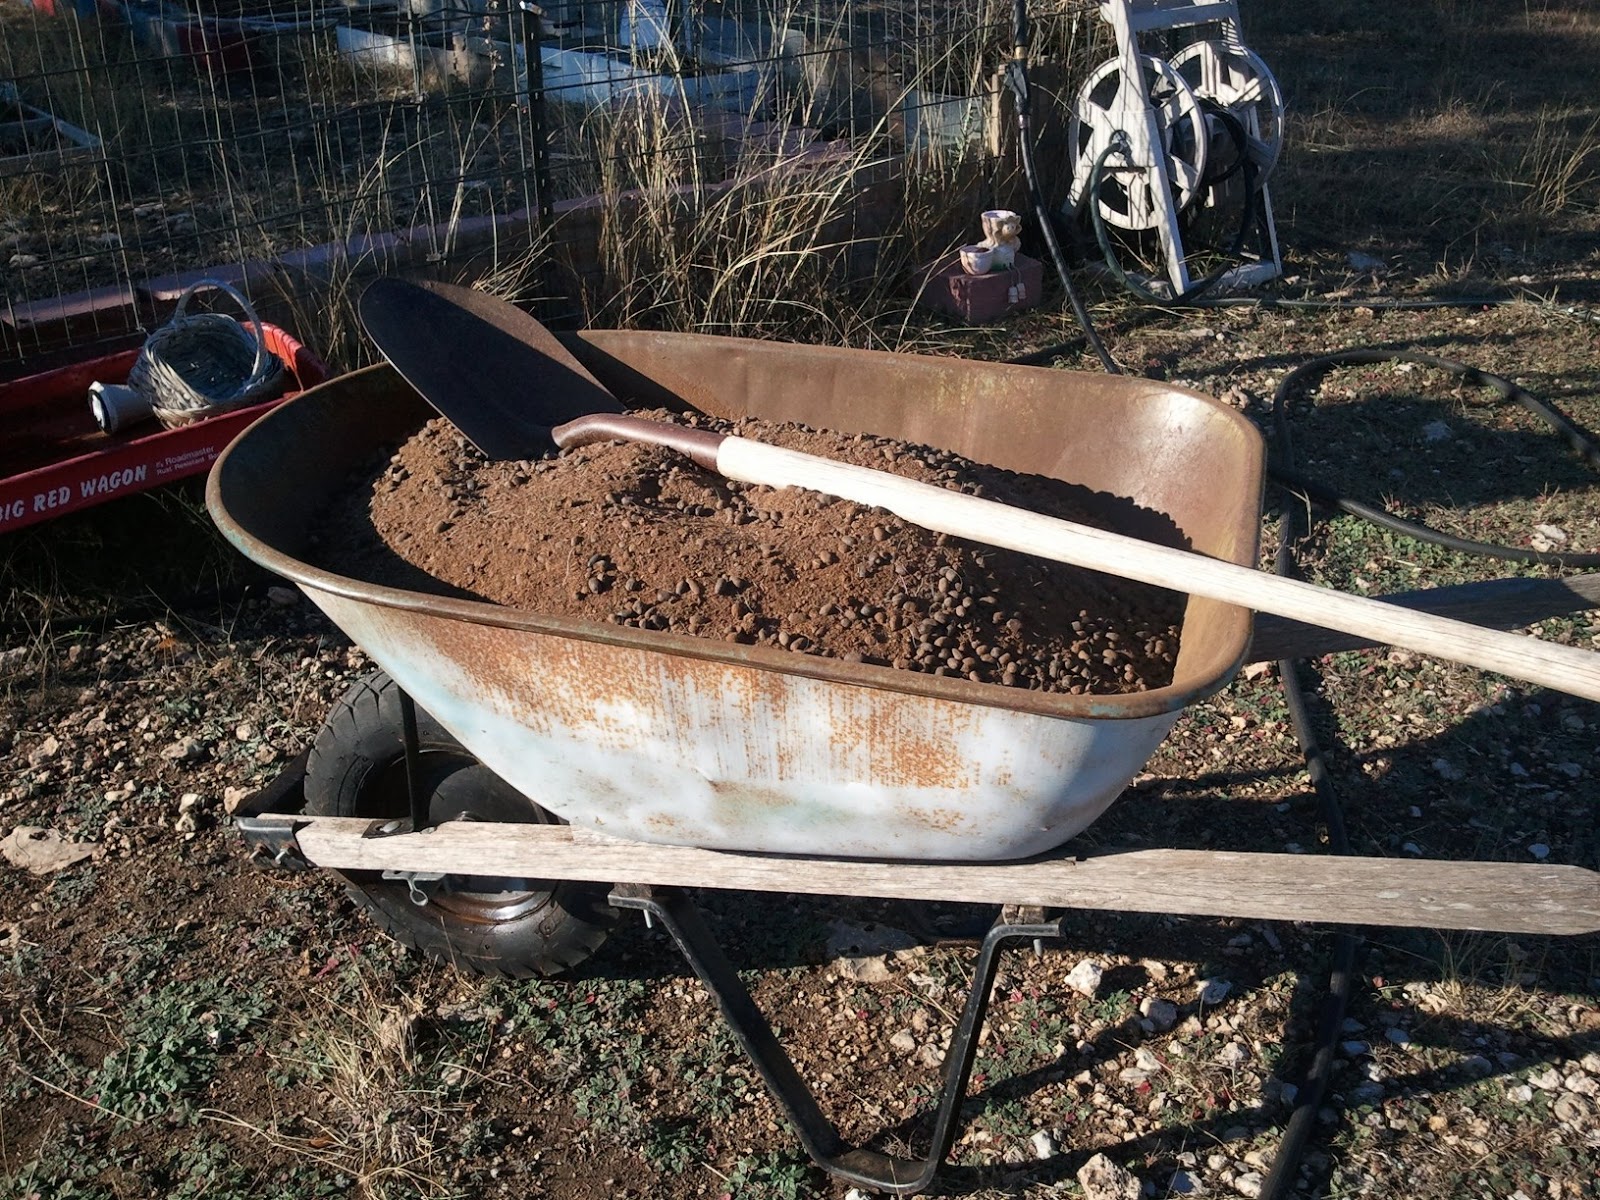
I started prepping my garden for spring at the end of December by putting on and turning under a layer of old manure. I later was given a partly used bag of peat and one of green sand and put those on and turned the garden again.


Winter garden


Wheel barrow of "seasoned" goat manure

Turning in the manure


Two of my neighbor-friends, Bonnie and Jenny, also garden. We go in together to start seedlings and Jenny graciously cares for them in her greenhouse throughout the winter. I have been informed that they are up and going strong! (Guess I should visit them!)

When I went out in early February to turn my compost, I had the pleasant surprise of finding a bunch of pumpkin seedlings coming up from a pumpkin I had discarded in early winter! I screened some soil and transferred the volunteer seedlings into pots. I also moved some cilantro that had self-seeded from last year so I could clean up the garden and turn the soil.

Old pumpkin with seedlings

Pumpkin seedlings

One of my favorite "shovels" for loose dirt, manure, and such. It is flexible enough to
mold to the shape of the wheel barrow and gets out most of the soil, etc!


In a storage shed I found some unassembled bee boxes that were not level enough to use for bees. These make excellent planter boxes and allowed me to expand my gardening area.

Bee boxes


I have also purchased a Top Bar Hive and ordered a package of bees to be delivered in April. I look forward to posting about my new hive and bees!


Unpainted top bar hive with observation windows


The garden is turned and most of the boxes and soil are in place for Spring. I feel a lot of satisfaction as I look ahead to a time of warm days and new beginnings! I thank God for his blessings and my heart says, "God is good, all the time!"


Most of the bee boxes and soil are in place. Getting excited!

Saturday, January 12, 2013

Fig Leathers (aka dried figs!)

In his heart a man plans his course,
but the Lord determines his steps.
Proverbs 16:9
 
I know that most people only think of Bible verses when big things happen, but I often think of them for the little things. Here's an example:
 
Last Sunday was the last day of our Christmas break. A teacher has tons of things to do in the 11th hour before school starts back up and I am no exception. As I was getting food out of the freezer to prepare for dinner, I noticed a lot of  UNFROZEN liquid in the bottom!! That is not a good thing to find in a freezer! I thankfully noticed that this was a new development since most of the food was still frozen solid. The liquid was from a couple of my bags of summer figs. I panicked, thinking of all the work and figs that might have been wasted and quickly got a big bowl to move the dripping figs. As it turned out, there was still frost on most of them and they smelled the same as when I had put them in, so no spoiled figs!
 
I had planned to make fruit leathers out of part of the figs, but not the last evening of Christmas break! I poured all of the gooey contents into a large pot and put it on the stove to simmer. After 10 minutes of simmering, I processed the figs in my Vita Mix then and poured them into a big bowl. I stirred in the liquid and spooned them out onto the drying trays of my dehydrator.
 
The next day after work they were ready! I peeled each layer off the tray, laid the layer on wax paper, rolled the wax paper and cut the leathers with kitchen shears. The fig leathers were wonderful!! I didn't add any extra sugar or preservative; they were just figs! I've shared many of them around and everyone tells me they are really good!

So even though I had many plans for the last day of my break and none of those plans included making fruit leathers, I think God helped me notice the figs before they spoiled and allowed me to make a yummy snack to share with my family and friends!! God's plans are always better than mine! (Mark vacuumed out from under the freezer and it seems to be working just fine!)
Simmering the figs 
Blending the simmered figs


Fig leathers after a night in the dehydrator


Roll the fig leathers on wax paper

Cut the fig leathers with kitchen shears

Sunday, December 30, 2012

So Long Sweet Spot!

All of our cats and dogs have just come to us. Even though we have not searched for them, once they were here we have accepted them into our family. Each one uniquely fills a place in our home and hearts. One special family member who came several years ago was our beloved cat Spot!

He appeared on a Thursday, briefly, then again on Friday permanently! That particular Friday I was hosting a group of children at my home for a celebration. Amid the hubbub, Spot wondered around like he had always been here. He had chosen us as his family!

My husband, Mark, runs his business from home and Spot became his constant outdoor companion, As Mark sat in his "thinking" place on the outside swing, Spot was right there at his side. Spot greeted me every morning as I left for work and every evening when I returned. He went on long evening walks and monitored goat-feeding time. Although he visited in the house from time to time, he preferred to be outside in the middle of the action!

Spot disappeared near the end of last October. We posted signs all around the area and called everyone who lived close asking them to be on the lookout. Over the next week we walked though fields, searched brush and called for him up and down the road near our house. All was to no avail.

Every morning and evening I still look around expecting to see him wandering up. He has been a fixture at our home for so long; we miss him. I have delayed mourning but since it has been over two months, I guess I finally must accept that he is not coming back.

Even though he is only precious to our family, I felt a need to honor his life and memory here. I'm sure many of you have had a special pet and understand my feelings of loss.

Sweet Spot

Sunday, November 25, 2012

Tasty Green Tomato Relish!

A freeze on November 15th is not unwelcome, unless you have a garden full of tomatoes! I heard the freeze forecasted, but could not make it home before dark, so I harvested by headlights. I ended up with 15 lbs. of green tomatoes, various peppers, tarragon, basil, and a small watermelon.


Unable to can the tomatoes until Thanksgiving break, I was surprised by how many turned red!


I was left with 13 lbs. of still-green tomatoes. Once they were washed, I started chopping up small batches in the food processor.


Each batch was added to a large bowl.


Next I chopped red and green bell peppers along with a few small jalapeƱos and Anaheim peppers from my garden and added them to the mix.


With streaming tears I managed to chop several onions to add to my bowl of green goodness!


The mixture was then packed into a colander to drain off the extra liquid.


Once the mixture was drained, spices were added and the mixture was put in a stock pot, brought to a boil and simmered for 5 minutes.


In the meantime, I had a deep pan filled with water with a folded dishtowel in the bottom. I used it to sterilize the jars and later used the same water in the water bath.


After the relish has simmered for 5 minutes, I removed it and spooned it into jars leaving a little space from the top, put the lids on and screwed the rings down until they were just snug.


Each batch was processed for 30 minutes.


Finally the jars were placed on a towel to cool. If a lid doesn't pop down, you can carefully remove the lid, wipe the lid and jar rim to make sure nothing is in the way of a good seal and reprocess, or just let the jar cool then store it in the refrigerator to enjoy right away!


All in all, the untimely freeze led to a yummy treat of green tomato relish serendipity!


Green Tomato Relish Recipe

24 large green tomatoes
3 red bell peppers, seeded
3 green bell peppers, seeded
12 large onions
3 tablespoons celery seed
3 tablespoons mustard sees
1 tablespoon salt
4 cups white sugar (the original recipe called for 5 cups)
2 cups cider vinegar

  1. In a food processor, coarsely grind tomatoes, bell peppers and onions. You will need to do this in small batches. Drain the mixture in a colander for 1 hour.
  2. In a non-aluminum stockpot, combine mixture, seasonings and vinegar. Bring to a boil and simmer over medium heat for 5 minutes.
  3. Sterilize jars. Pack mixture leaving a small amount of air space at the top of the jar. Seal with lid and ring.
  4. Place filled jars on rack or towel in pot of hot water. Bring to boil and process for 30 minutes.
  5. Remove and place on a towel to cool. Lids should pop down if sealed properly.


http://allrecipes.com/recipe/green-tomato-relish/

Wednesday, November 21, 2012

Recandle!

Some things just bother me! For years I have been frustrated by the amount of wax left after a candle burns down.


What a waste to throw it away, but what do you do with it? With a little expense (very little), effort, and supplies, you can easily create "new" candles from the old!


Buy: wick, metal wick holders, small containers with wide mouths (if you don't already have countless ones sitting around with the dregs of former candles in them!)

Gather: small pan with lid, double boiler or steamer, knife, scissors, wax paper (newspaper, etc.), and needle nose pliers (regular pliers will work, just not as easily).

Note: If you want to start from scratch, you can buy paraffin or beeswax, essential oils (for fragrance), and old crayons (for color) to use instead of spent candles.


If you are using an old candle container with a bit of wax left, put it in the steamer basket over the hot water with the lid on. After it has melted you can use a paper towel to wipe it out (if the color, fragrance or condition bother you) or just pull out the old wick and leave the wax in the bottom as a starter.


While that is melting, measure the depth of the jar and cut a piece of wick to reach from bottom to top. Use the pliers to attach the metal base and set this aside.


Once the wax has melted, remove the pot to the counter. Put down the wax paper and begin using the knife to pare off thin shavings of wax from the old candle (or pare the crayon and new wax into pieces if starting fresh).


Place the prepared wick in the container and fill around it with candle shavings. Press down as you fill, removing air. There will still be air pockets, so overfill as the wax will settle to a lower level once melted. Put the container and steamer back on the stove to melt.


Once the wax has melted, be sure the wick is still standing up straight and let the "new" candle cool.


If there was still some wick left on the old candle, it should now burn better since it will get more air circulation, so you might get two candles out of the deal!!


The red candles pared down. A new candle in the making!
 

Monday, November 5, 2012

Politically Correct!


In honor of our upcoming election, I wanted to share my favorite political story. It happened four years ago in my classroom.

Two of my students had similar personalities but were polar opposites when it came to political parties! Heated discussions like, "How could you support that candidate? He doesn't care about people!" and "Why would you want that person to be president? He just wants to take away our freedoms and our money!" Each day brought new arguments and angry responses. I was becoming weary of the debate!

Election Day finally came.... I was on pins and needles! Not only was I nervous about my own party winning, I was faced with the fact that when I got to school the next day there was going to be ONE upset student! When the results were in, the Democrats won and Obama was our new president. I didn't know what to expect!

I arrived at school ready for the showdown. No sooner had class started than the student who supported the winning candidate approached the other student's desk..... I stood nearby, waiting to intervene. The approaching student looked down at his "opponent" and said quite frankly, "Your candidate lost." I held my breath. There was silence. That same student then stuck out his hand and said, "I'll bet that makes you feel bad and I'm sorry about that!" Stunned silence! The boys shook hands and were seated. No argument, no explosion, it was over.

Those students became friends that year and are friends to this very day! They still have the same strong opinions, but they value each other! I think we could all learn a thing or two from these two students this election season!

Still friends four years later!

Saturday, November 3, 2012

Ode to the Lowly Chrysanthemum


I used to be a chrysanthemum snob! Chrysanthemums were "granny" flowers. I was much too sophisticated to notice them. I wanted beauties such as Bleeding Hearts and Azaleas! I spent time trying to amend my alkaline, North Texas soil to successfully grow these showy plants, only to find they would soon become scraggly and unattractive. I also tried my hand at roses. Time, money, and bleeding hands were soon more than I was willing to sacrifice.

Time passed. One of the gifts my students sometimes gave me was a pot of chrysanthemums. I would give the obligatory "ooh and ahh" over their blooming kindness, add water and set the pot in the window until it became overgrown and leggy. Then I would lug it home because I felt too guilty to just let it die. I would stick it in the ground somewhere, anywhere, out of the way.

As I watered my garden, I would occasionally remember these little afterthoughts and spray a drink their way. I slowly noticed that even though I neglected them, they would struggle back year after year!

When I put my official flower bed in along the front of my house, I dug up the various chrysanthemums that I had stuck here and there and planted them in the prepared bed. I nurtured them along with the garden-center plants I had purchased. The chrysanthemums became huge and showy, crowded with smiling blooms! Those glorious blooms stayed on literally for months! I fell in love with my chrysanthemums and they soon became my favorite flowers!

I lost several of my plant friends in a recent drought. It was sad; I had some for 5-8 years. I have slowly planted new friends. On my teacher gift list at school I proudly wrote “chrysanthemums”, hoping for more of these precious gifts that keep on giving!


Such a happy color!

One plant cascading over the wall!


Purple pretties!


Small and delicate!

One of my new friends!

Still blooming strong 5 years and one drought later!
Another new friend. Such a pretty color combination!